Take each of the die cut pieces of 1/8" plywood and glue them together to make 1/4" thick pieces. I found that these clips work very well when you don't own wood clamps. Interestingly, the surface of the clip is rounded, so there was no marking on the wood when I took it off. I used Elmers Waterproof Wood Glue. Any wood glue should do.


Once dry, start sanding. I used a 150 grit initially and then switched to a 220 grit to finish it off. Keep sanding until it is smooth. Sand a bit more if you are going to stain instead of paint the stand. If you are going to stain the wood, keep sanding until you have a nice polished end grain. I know this is not the most entertaining part of the build, but if you take the time, the end result is pretty nice.
I remember doing woodworking in 4-H as a kid. In the first couple of years, you were not allowed to use power tools. Everything was done by hand. I loved coming up with the projects, getting the wood, sawing all of the pieces so that they fit.....and then it always came. The sanding. I HATED to sand all of those pieces. I just wanted to put them together and cover it with some stain. It's not like anyone would know, right? I remember sitting at my grandparents house under the tree next to the birdbath one summer evening sanding all of the pieces to a project. Everyone else was sitting on the porch talking, but I had to sit outside because of the sawdust. I hated it.....until it was done and the wood felt like satin on your fingertips. Amazingly I now enjoy sanding the wood. I actually find it relaxing.
As you are sanding, you will inevitably come up with the same question that I had. Who's idea was it to put round holes in this thing? Solution: Take a strip of sandpaper and tape one end to the drill bit. Wrap it counter-clockwise around a drill bit. Tape again. Presto chango.... Now you own a power sander!

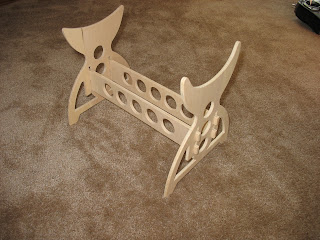
Dry Fitting the stand together to make sure everything fits well. Sand or make adjustments as you go. It should fit snug.


So the instructions recommend painting the stand. For some reason, I can't stand to paint wood. Just doesn't seem natural. So I decided to stain it. Here is where all of the sanding pays off. The laminate actually provides an interesting detail on the end grain if you took the time to sand well. I I decided I wanted more of a cherry finish. Luckily we had an old can of stain under the kitchen sink. I don't even remember why I had it, but I am pretty sure it has moved from Indiana to Alabama and now to North Carolina with me. Might as well use it.

After 4 coats of Sedona Red 22 stain the color finally ended up close to what I wanted. So the next step was polyurethane. I learned a valuable lesson. You can't always trust the guy at Lowes. I asked if a disposable sponge brush would work to apply the polyurethane. His answer was a resounding "Sure, I don't see why not!" Which I should have interpreted as "How in the world would I know, I have never done it." The result was approximately 234 small bubbles per square inch on every surface. So after allowing the piece to dry, I re-sanded the piece, I put two more coats of polyurethane WITH A BRUSH! Ironically, I was watching "Ask this Old House" last weekend and they actually had an episode showing how to re-finish furniture. They guy actually showed the proper technique for putting on polyurethane. First, no shaking the can (this part I knew...creates a lot of bubbles). Second.....you guessed it....use a brush. Apply the polyurethane in thin coats over a small section. Once you have a thin coat on an area, you back and use the very tip of the brush to make long strokes along the wood to take out any bubbles or lines. This is called "Tipping". Overlap slightly and work on another section. Would have been good to know before I started.

Finally, cut the two foam tubes down the center and put them over the edges of the stand to protect the hull of the boat.

Put the hull on the stand to make sure it seats well, and enjoy your handiwork. With that, the stand is officially finished.

